I had a sudden change in direction lately when I slipped on the ice and broke my wrist. More posts when I resume weaving.
Monday 6 December 2010
Thursday 2 December 2010
Starting to weave!

I fastened the yoke section flat onto a sturdy cardboard to begin weaving. Duct tape and pins hold it firm. There have been some difficulties keeping a good tension on the warp. The rest of the loomskin is wrapped in pillowcases and pulled tight around the back of the card out of the way.

At last I threaded my new bone needle with the beige yarn and a strand of turquoise and began to weave at the neck edge.
Wednesday 1 December 2010
Fastening down the warp
Warping the JACKET has taken much longer than I imagined. I set aside a six hour stretch last Thursday to do this job. But that wasn't nearly enough time and I've spent several hours a day for 5 more days to finish. Here is the completely warped loomskin.

I fastened the warp down using a variety of methods. Threading a cord through the holding stitiches at the yoke edge to hold down warp pairs. Threading a cord through the rows of holding stitches at the hem. Tying each of the stitches at the end of each shaping wedge, etc.


Friday 26 November 2010
Warping
I have begun to warp the JACKET at last.


I lay out a section of the loomskin on a pin board (made of many layers of thick cardboard) and place a pin everywhere the warp will need to make a turn. There is a row around the neck edge, along the hem, and where the shaping requires extra pairs of warps.

I did the buttonholes area in sections. These are some shorter bits of warp which I apply using a needle and thread through the holding stitches.

Then, I wind the warp continuously onto the pins.
Thursday 18 November 2010
Applying the holding stitches
 |
| Holding stitches for take up at the hem |
 |
| Holding stitches to hold shaping wedges |
In the middle of tapered parts, I put single stitches with the ends unfastened. When I wrap the warp threads around the pins, I will tie these ends to hold the turns in the warp in the correct position for weaving.
 |
| Holding stitches for neck edge, yoke & buttonholes |
Final adjustments to the loomskin markings
 |
| The whole loomskin |
 |
| A patch on the yoke to fix the chart |
Saturday 6 November 2010
Warping test
Now that the loomskin can be laid flat to work, I'm ready to do the last bits of charting. I'll need to mark the places for all the holding stitches.
 I decided to do a quick warping test to see if the kinds of holding stitches I plan to use are actually going to work the way I imagine. I drew up a square on a rough bit of fabric and marked some holding stitches. Some stitches I put in before pinning down, some more I need to try after pinning.


I warped it and threaded through the previously placed holding stitches to hold down the warp. That worked quite well.

Then I tried using an upholstery needle to add more holding stitches. These were much more difficult than I thought and probably aren't practical (see the row holding down the top of the warp). I'll need to do almost all the holding stitches before pinning down the loomskin. The only exception will be the large anchoring stitches across five or six warps which don't need precision.
Sunday 31 October 2010
Preparing the forms and cutting the loomskin

Before cutting I took the opportunity to measure the sleeves and body of the jacket and to make the forms I will need when I weave those sections.

The sleeve forms are shaped pieces of cardboard which I will roll up and tape. The body form is shaped from a stack of styrofoam sheets with a cardboard cover front and back. I tried both sleeve and body forms inside the jacket to make sure they fit well. At the right stage, the loomskin will be pulled taut and attached to the forms for the weaving.

Finally I took the plunge and cut along the lines I had established.

I machine stitched along the cut edges to attach the reinforcing strips firmly.

The loomskin is now in three pieces. The main piece lies flat with five sections splaying out from the round yoke. The two underarm pieces each have a curved seam which joins the lower panel of the sleeve to the side panel of the body.
Saturday 30 October 2010
Charting the warp on the loomskin


I came up with a method for the shaping where the sleeves meet the body and tested it.
 My goal at this stage was to establish cutting lines parallel to the warp in order to make the loomskin lie flat for warping. Before cutting I applied strips of sturdy fabric to the back of the cutting lines to reinforce the edges.
 Saturday 23 October 2010
Testing take up and drafting the hem


Friday 22 October 2010
The loomskin

This jacket fits me well so it became the basis for the weaving. Here I've marked with pins where the edge of the yoke will come.
 After pinning and measuring the yoke on the jacket I began to draw up the warping pattern for the yoke using the sett ruler. I worked first on paper and then on interfacing which I eventually sewed onto the loomskin. This took several attempts and I was glad of Frieda's help to hold the things in position for me. When I stand her on the table, she is just my height! (Frieda is the name my daughter gave my homemade dressmaker's dummy).
Thursday 21 October 2010
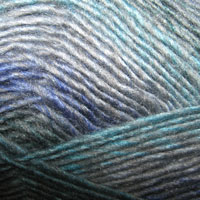
The colours
 I started planning the colour scheme after my sister gave me the base yarn, a lovely warm beige flecked wool.
I kept looking for the colours I'd like to blend with it and finally found the knobbly white, and the shiny turquoise.


Tuesday 19 October 2010
My sett ruler and pin-woven samples

I made my sett ruler based on the required number of threads per cm in my project. This depends on the thickness of the yarn and the spacing I want for it (close and compact for stiffness or wider spaced for softness and drape). With the yarn I'm using I settled on a sett of 10 threads per 4 cm to give a fairly firm fabric that isn't too stiff for comfort.
 The sett ruler has alternating black and red marks. The distance between the black marks is the width of a pair of threads. This then becomes the unit of measure for charting everything about the piece I'm going to weave:
 - where the pins go for the top and bottom of the warp
- the size of the increments for increases and decreases of shaping
- where the warp turns to form the wedges for shaping
- size and placement of buttonholes.

I use the sett ruler when I make pin-woven samples. The sample shown has 12 warp threads and 12 weft threads, so I have drawn the chart of it with six spaces across marked with black marks from the sett ruler and 6 spaces long. The other end is marked with red marks. Then I place the pins at both ends and wrap the warp, starting and ending at the black end. I weave the piece while it is pinned down, remove the pins and darn in the ends.
Monday 18 October 2010
Other miscellaneous things I learned

 Other little projects - I did two other projects entirely with pins and no holding stitches: a little case using a piece of styrofoam packing material, and a zipped bag built around a custom built box filled with styrofoam. The piece of foam wore out with the friction of the needle while weaving; it crumbled a bit and the pins loosened. It barely held up to the end of the weaving. The custom built box filled with foam was sturdy enough to allow me to reuse it for three more projects the same size before the pin holes became too loose to hold well. These were good practice for charting a warp and weaving in the round.
Miscellaneous tests - Along the way I kept figuring out other details like how to chart the warp and weft effectively, the best way to chart the shaping wedges, what kinds of holding stitches were needed for various purposes and how to solve the problem of take up in the warp.
Mini projects and what I learned from them (part 5)
 Bag project – This is the project on which I tested the idea of a "loomskin". I charted the warp and weft onto a piece of sturdy fabric, marked all the pin positions and sewed in the holding stitches. Then I laid the loomskin out on cardboard and inserted the pins. After wrapping the warp onto the pins, I attached the warp to the fabric by catching the warp threads down with yarn threaded through the holding stitches.
 The flap of the bag was flat, so I wove it before taking the piece off the flat cardboard. After this I fastened the loomskin around a shaped cardboard form so that the rest of the weaving could be done all in one piece in the round.
I also used this project to test a semicircular weft because by this time I was considering a round yoke design for the JACKET. Both the loomskin idea and the semicircle weft worked well and I began to finalize the pattern..


Sunday 17 October 2010
Mini projects and what I learned from them (part 4)
I discovered a better way to warp shaped weavings

Collar project, pin weaving experiment – This project was a breakthrough because I realized I could weave a shaped piece with the warp pinned down. There didn't need to be any bothersome threading of the warp through holding stitches because it could be wrapped continuously around the pins. This was much quicker. I used a method reminiscent of bobbin lace by pulling the warp out straight and weaving a section, then repositioning the ends of the warp to gradually curve the piece.


After this I began to explore the possibilities of using pin warping as an interim stage for warping a more complex piece. I came to the idea that the warp could be first wrapped on pins on a flat surface to get it in place and then attached to a fabric backing with holding stitches. Then the fabric backing could be attached to a 3D form for weaving. I called this idea of a warp attached to a removable backing fabric a "loomskin" and I tested it on a bag project.(see next post)
Mini projects and what I learned from them (part 3)

Waistcoat project – In this project I used a progressive approach by weaving the collar first on its own little shaped cardboard loom with long ends hanging off the bottom. When I finished weaving the collar I removed it from the collar loom and attached it to the large cardboard assembled loom to weave the rest of the garment. I warped the waistcoat with a selvedge at the top of garment and ends left long at the hem to darn in at the end. All other edges were finished while weaving. The progressive approach worked really well. I determined to find a way to make a continuous warp to avoid all the ends that needed darning in at the hem.


Subscribe to:
Posts (Atom)